Studio 3DX Evolutionary Update: Online Editing for 3D Models
Entering 2024, we promised you new exciting things from Studio 3DX. And we keep and deliver our promises. We are proud to have released a revolutionary update to our platform, Studio 3DX Editor! With this latest enhancement, designers can now edit their 3D models and scenes online before sharing them. Achieving this level of online functionality, especially with complex or large models, has been a significant challenge. However, our proprietary algorithm optimizes models to a degree that allows seamless uploading and editing, creating an online 3D space ready for refinement and sharing through a simple URL link.
Imagine taking your 3D model from your favorite desktop design software and bringing it to life in Studio 3DX. Upon uploading your 3D model, you will be prompted to choose the optimization level—Normal or Ultra*.

Editor Features and Tools
Our enhanced editor comes with a suite of tools designed to give you full control over your 3D scenes and models. Here’s an in-depth look at each feature and its impact on your designs:
Scene Tools
1.1. Starting Camera Position
As a starting edit point, you can set the initial viewpoint and field of view (FOV) so that your audience is captured from the first sight. This feature ensures that the most engaging perspective of your scene is the first thing viewers see, setting the stage for a three-dimensional exploration from every angle. Let’s say that setting the camera to highlight the sleek design of a new car model ensures potential buyers are immediately impressed.
1.2. HDRI Background & Environment
Your familiar favorite from the Studio 3DX viewer is now available in the editor. Choose the right background to highlight your design, whether it’s a forest cabin or a view of Earth. Even a plain color background retains the environment's reflections, lights, and fog, adding depth and realism to your model. For example, using a forest background for a wooden cabin design can enhance the natural feel and make the cabin look more integrated with its surroundings.
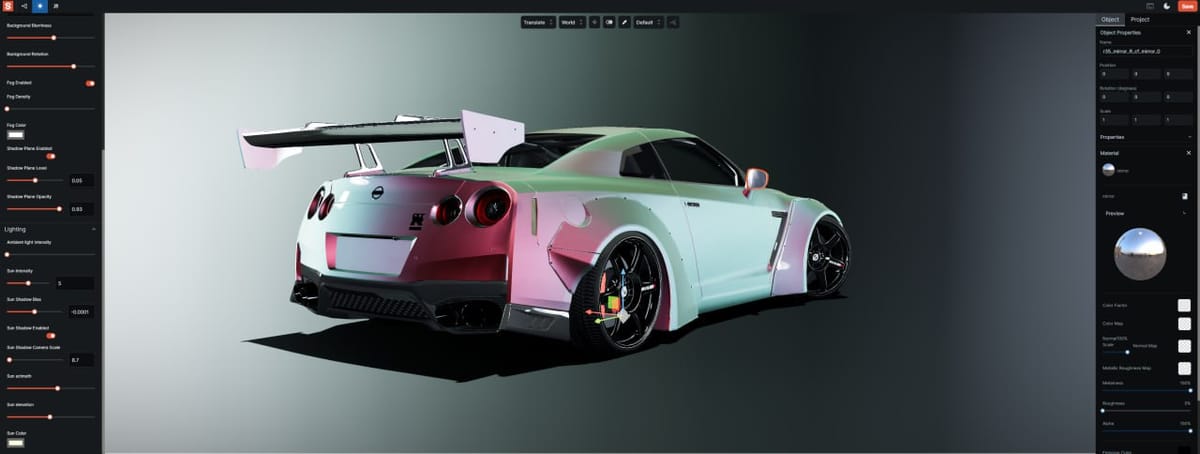
1.3. Lighting
Adjusting ambient light intensity, sun intensity, sun shadow bias, sun shadow camera scale, sun azimuth, color, and elevation allows you to fine-tune the lighting of your scene. These adjustments can dramatically alter the mood and visual appeal, from creating soft, diffuse lighting to sharp, high-contrast shadows. Try adjusting the sun intensity and azimuth for an outdoor furniture set to create the perfect golden hour effect, making the scene more inviting.

Post Processing
2.1. SSAO (Screen Space Ambient Occlusion)
Adjust the intensity, samples, denoise samples, denoise radius, and distance falloff to enrich the depth and realism of your model. In other words, SSAO adds subtle shadows in creases, corners, and near objects, making the scene look more three-dimensional. For example, increasing SSAO intensity on a sofa design can make the fabric folds and creases appear more realistic and tactile. Bare in mind however that higher settings increase the effect’s quality but may impact performance.
2.2. Bloom
Bloom effects can give your model a soft, radiant look, enhancing the visual appeal of light sources and reflective materials. Control the bloom intensity, threshold, smoothing, and kernel size to add a glow to bright areas of your scene. Imagine a chandelier design with dazzling and lifelike lights thanks to the right bloom intensity settings.
2.3. Tone Mapping
Choose from Reinhard, Reinhard 2, Reinhard 2 Adaptive, Uncharted 2, Cineon, ACES, and AGX to control how colors and brightness are mapped. Different tone mapping settings can simulate various filmic looks, from high contrast to subtle gradations, influencing the overall mood and aesthetic of your scene. Try using Uncharted 2 tone mapping for an architectural visualization for a cinematic feel to the final render.
2.4. Chromatic Aberration
Chromatic Aberration will allow you to introduce subtle color fringing around the edges of objects to mimic the imperfections of real-world lenses, adding a layer of authenticity and depth to your rendered scenes.
2.5. Vignette
Apply a vignette effect to darken the edges of your scene, drawing attention to the center and enhancing the cinematic quality of your model.
Material Editing
3.1. Color Factor
Choose and refine your model's colors using a color map. Upload your own maps and enhance them with normal maps to add texture and realism to your materials. For instance, adjusting the color factor for a car interior can bring out the richness of leather seats or the texture of the dashboard.

3.2. Metallic - Roughness
Adjust the metallic and roughness values to define how materials interact with light. For example, increasing roughness makes a surface appear matte, while a lower roughness makes it shiny. Use this tool to create realistic metal, wood, or glass surfaces. A metallic roughness map can make a stainless steel kitchen appliance look sleek and modern, or give a rustic wooden table a more natural, weathered appearance.
3.3. Emissive Color
Select an emissive color and intensity to make parts of your model glow, simulating light emission. This is perfect for creating effects like glowing screens or lights. Using an emissive color on the dashboard controls of a yacht can make them stand out in low light conditions, enhancing usability and visual appeal.
3.4. Reflectivity
Control the reflectivity to determine how reflective your materials are. High reflectivity is ideal for mirrors or polished metals, while lower reflectivity suits materials like plastic or wood. Adjusting reflectivity on a glass surface can make it more transparent, allowing viewers to see the interior from the outside.
3.5. Transmission Factor
Adjust the transmission factor to control transparency. For example, set it high for clear glass and lower for frosted or milky glass. Using a high transmission factor on a glass shower enclosure in a bathroom design makes the space look open and airy.
3.6. Dispersion
Simulate the dispersion of light through transparent materials, adding realistic color separation (like a prism effect) to your model. Applying dispersion to a crystal vase can create beautiful rainbow effects that add elegance and realism to the scene.
3.7. Clearcoat & Clearcoat Roughness
Add an additional layer of shine to your materials with clearcoat. Adjust the roughness to control how smooth or textured this layer appears. Test it by applying clearcoat to a car model and notice how it can give it a showroom finish, making it look brand new and highly polished.
3.8. Sheen Color & Factor & Roughness
These settings can add a soft, fabric-like sheen to materials, perfect for simulating surfaces like velvet or satin. Adjust sheen settings on a sofa fabric to give it a luxurious, soft appearance, making it more appealing in interior design renders.
3.9. Iridescence Factor, IOR, and Thickness
Control the iridescence effect to make materials change color at different angles, mimicking effects seen in nature (like soap bubbles). Adjust the Index of Refraction (IOR) and thickness for more realistic results. Applying iridescence to a car paint job can create a striking, color-shifting effect that grabs attention.
3.10. Specular Intensity, Color, and Direction
Fine-tune the highlights on your model with specular settings. Control the intensity, color, and direction of specular highlights to enhance the realism and visual appeal of shiny surfaces. Verify this by adjusting specular intensity on a kitchen countertop can make it look polished and clean, enhancing the overall kitchen design.
Transforming Your 3D Designs
Imagine the possibilities: from a piece of furniture to a vehicle, a marine asset, or an entire building, Studio 3DX’s editor allows you to transform your 3D designs into fully rendered scenes viewable from every angle. Any changes you make are reflected live in the viewer and accessible via a unique URL, which can be password-protected or shared with our community.
Join Us in Redefining Online Rendering
We are here to give a whole new essence to online rendering and presenting 3D designs. The applications are endless, and once you discover the capabilities of Studio 3DX, your creativity will know no bounds. Try it out today and bring your 3D models to life like never before!
*We recommend the Ultra optimization option only for larger models, as it optimizes the model for web management but limits some editing capabilities.