Step-by-Step Tutorial: Optimising Blender Models for Web
Blender's capabilities extend beyond creating stunning 3D models—it's also a powerful tool for delivering immersive web experiences. This step-by-step tutorial will guide you through the process of meticulously preparing your Blender models for the web and seamlessly exporting them to the glTF format, ensuring optimal performance and visual appeal.

Step 1: Model Optimisation for the Web
- Start by optimising your model for web delivery. Use Blender's decimate modifier or manual techniques to reduce polygon count while maintaining essential details.
- Clean up your model by removing duplicate vertices, fixing normals, and resolving any overlapping geometry issues.
Step 2: Material and Texture Assignments
- Assign materials to different parts of your model for realistic rendering. Leverage Blender's node-based material editor for granular control over appearance and shading.
Ensure your textures are properly UV-mapped to avoid distortion during rendering. Navigate to the UV Editing workspace to unwrap and layout UVs for each component.
Step 3: UV Mapping Techniques
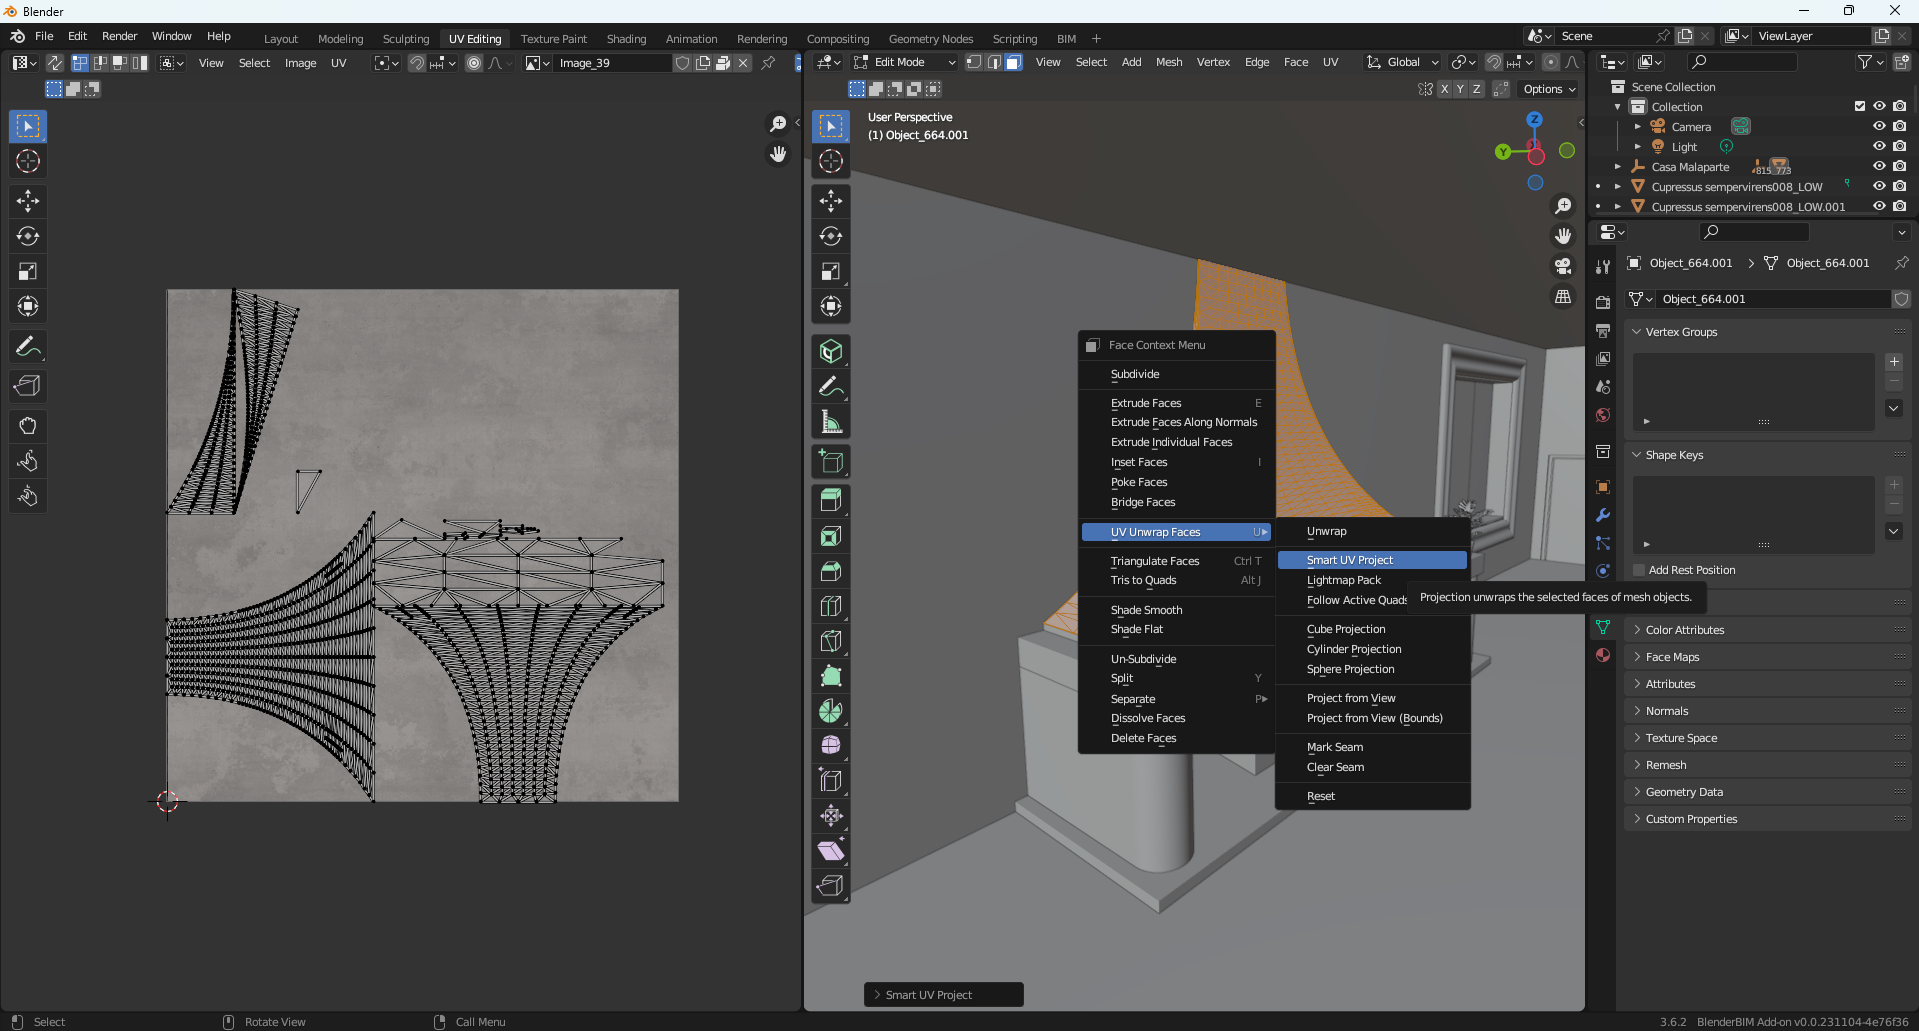
- Dive into Blender's UV Editing workspace to unwrap your model accurately. Utilise tools like Smart UV Project, Mark Seam, and Unwrap to efficiently map UVs.
- Minimise stretching and distortion by adjusting UVs appropriately. Blender provides tools for relaxing and pinning UVs to streamline this process.
Step 3: In-Depth UV Mapping Techniques
Sub-step 3.1: Navigate to the UV Editing Workspace Begin by transitioning to Blender's UV Editing workspace. This dedicated environment provides a comprehensive set of tools for unwrapping and manipulating UVs, facilitating a more precise and tailored mapping process.
Sub-step 3.2: Smart UV Project for Quick Unwrapping Leverage the Smart UV Project tool to expedite the unwrapping process. This method automates UV mapping, intelligently breaking down your model into UV islands. Adjust the island margin to control the spacing between UVs, ensuring a balanced layout.
Sub-step 3.3: Mark Seam for Manual Control When intricate control is needed, employ the Mark Seam tool. By strategically placing seams on your model, you guide Blender in creating UV islands. This manual approach proves invaluable for complex geometries, allowing you to define seams where texture transitions are seamless.
Sub-step 3.4: Unwrap for UV Island Placement Once seams are marked, use the Unwrap tool to generate UV islands based on the designated seams. Blender's advanced algorithms ensure an optimal distribution, preserving the model's details. Explore different unwrap methods, such as Conformal or Angle Based, to find the most suitable mapping for your specific model.
Sub-step 3.5: Adjusting UVs for Minimised Distortion Mitigate distortion by meticulously adjusting individual UVs. Blender provides tools like Proportional Editing, which allows you to modify one UV while influencing its neighboring UVs. Pinning and relaxing UVs in areas prone to distortion contribute to an overall harmonious UV layout.
Sub-step 3.6: Utilise UV Pinning and Relaxing To refine the UV layout further, utilise UV pinning and relaxing tools. Pin specific UVs to their locations to anchor critical details, and then apply the relax operation to distribute UVs more evenly. This step ensures a balanced distribution of texture information across the model's surface.
Sub-step 3.7: Check for Stretching and Distortion Continuously assess the UV layout for stretching and distortion. Blender provides visualisation tools to highlight problematic areas, enabling you to pinpoint and rectify issues. Adjust the scale and proportions of UV islands as needed to achieve an optimal mapping that enhances texture fidelity during rendering.
Sub-step 3.8: Fine-Tuning UV Maps for Specific Textures For models with multiple textures or materials, consider creating separate UV maps for each. This meticulous approach enables you to tailor UV layouts to individual textures, ensuring each receives the attention it requires for optimal rendering quality.
By delving into these UV mapping techniques, you gain a nuanced understanding of how to unwrap and manipulate UVs in Blender. This in-depth process is essential for maintaining texture integrity, minimizing distortion, and enhancing the visual appeal of your 3D models on the web.
Step 4: Exporting to glTF
- If it doesn’t appear by default in the export option you must install the 'glTF Exporter' add on in Blender. Navigate to the Export menu and select the glTF format.
- Configure export settings, including options for textures, animations, and cameras based on your project requirements. Ensure your chosen options align with web compatibility standards.
Step 4.1: Exporting to glTF for Studio 3DX Integration: Incorporating your Blender models into Studio 3DX is a seamless process, given that Studio 3DX operates as a standalone web-based solution that accepts .glb (glTF) files. Here's how you can export your models for optimal integration:
- Prepare Your Model:
- Prioritize the necessary model preparation steps, including optimisation, materials assignment, and UV mapping, as outlined earlier in the article.
- Access the Export Options:
- In Blender, navigate to the Export menu and select the .glb, the binary version of glTF format, as Studio 3DX readily supports this file type.
- Configure Export Settings:
- Tailor the export settings based on your project's requirements. Ensure to include textures, animations, or cameras as needed for a comprehensive 3D experience.
- Specify Export Path:
- Define the export path for your glTF file. Ensure the file is saved in a location accessible for subsequent uploading to Studio 3DX.
- Export Your Model:
- Execute the export process to generate the glTF file containing your 3D model and associated assets.
- Upload to Studio 3DX:
- Navigate to Studio 3DX, where you'll find a user-friendly interface for importing 3D models. Initiate the upload process and select the glTF file exported from Blender.
- Organise within Studio 3DX:
- Follow Studio 3DX's intuitive steps to organise and arrange your model within the platform. The standalone web-based nature of Studio 3DX ensures a hassle-free import process.
- Enhance Presentation in Studio 3DX:
- Leverage Studio 3DX's suite of tools to elevate your 3D presentation. Utilise features for video and audio engagement, transforming your 3D design into an interactive and immersive experience for stakeholders.
By exporting your Blender model to glTF and seamlessly importing it into Studio 3DX, you harness the capabilities of a standalone web-based solution. Studio 3DX's compatibility with glTF files ensures a straightforward integration process, allowing you to present your 3D designs effortlessly and engage stakeholders in a dynamic online environment.
Step 5: Optimisation for Web Delivery
- Prioritise an optimised file size for efficient web loading. Consider reducing texture resolutions and removing unnecessary data to strike a balance between visual quality and performance.
- Test your model in a web environment before publishing. Verify compatibility in various web browsers to identify and address any issues related to materials, textures, or scaling.
Further optimisation
Substep 5.1: Texture Resolution Adjustment Begin the optimisation process by evaluating and adjusting texture resolutions. Consider reducing the resolution of textures while preserving essential details. Blender allows you to control the texture size during export, striking a balance between visual quality and file size. Experiment with different resolutions to find the optimal compromise for efficient web loading.
Substep 5.2: Removal of Unnecessary Data Trim excess data from your model to streamline its file size. This includes removing unseen or redundant geometry, unused materials, and unnecessary modifiers. Blender's 'Clean Up' tools can be valuable in identifying and eliminating superfluous elements, contributing to a more lightweight model for web delivery.
Substep 5.3: LOD (Level of Detail) Implementation Implement Level of Detail (LOD) techniques to provide varying model detail based on the viewer's distance. This involves creating simplified versions of your model for distant views, reducing the computational load on the web browser. Blender facilitates LOD creation through the use of modifiers and simpler mesh representations.
Substep 5.4: Compression of Textures Optimise texture delivery by utilising compression methods. Blender allows you to choose from various texture compression options during export, such as JPEG or PNG. Balancing compression settings is crucial, ensuring a smaller file size without compromising visual quality excessively.
Substep 5.5: Test in a Web Environment Before finalising your model, conduct thorough testing in a web environment. Deploy your 3D model on various web browsers to identify potential compatibility issues. Pay close attention to rendering performance, texture display, and overall responsiveness. Address any discrepancies by refining your export settings or making necessary adjustments to the model.
Substep 5.6: Consider Web Standards and Formats Adhere to web standards and recommended formats for 3D content. Verify that your chosen export format, glTF, aligns with the specifications supported by most web browsers. This ensures a seamless integration of your 3D model into web applications and platforms.
Substep 5.7: Minimise the Number of Materials and Textures Reduce the complexity of your model by minimising the number of materials and textures. Consolidate textures where possible, and merge materials with similar properties. This not only simplifies the model but also contributes to faster rendering times on the web.
Substep 5.8: Implement Efficient Lighting Techniques Consider optimising your model's lighting setup for web delivery. Use baked lighting or simplified light sources to reduce computational overhead. Experiment with techniques like normal map baking to convey detailed lighting information without the computational cost of additional geometry.
By meticulously addressing these optimisation considerations, you ensure that your Blender model is not only visually appealing but also efficiently delivered on the web. This comprehensive approach guarantees a smooth and immersive experience for users interacting with your 3D content across various web platforms.
Following these detailed steps empowers you to seamlessly prepare your Blender models for web deployment and export them to the glTF format. This approach not only ensures a visually appealing online presence but also maximises accessibility for a diverse audience. Blender's robust tools, combined with glTF's efficiency, make this process an accessible and rewarding endeavor for creators seeking to share their 3D masterpieces on the web.
Scripting
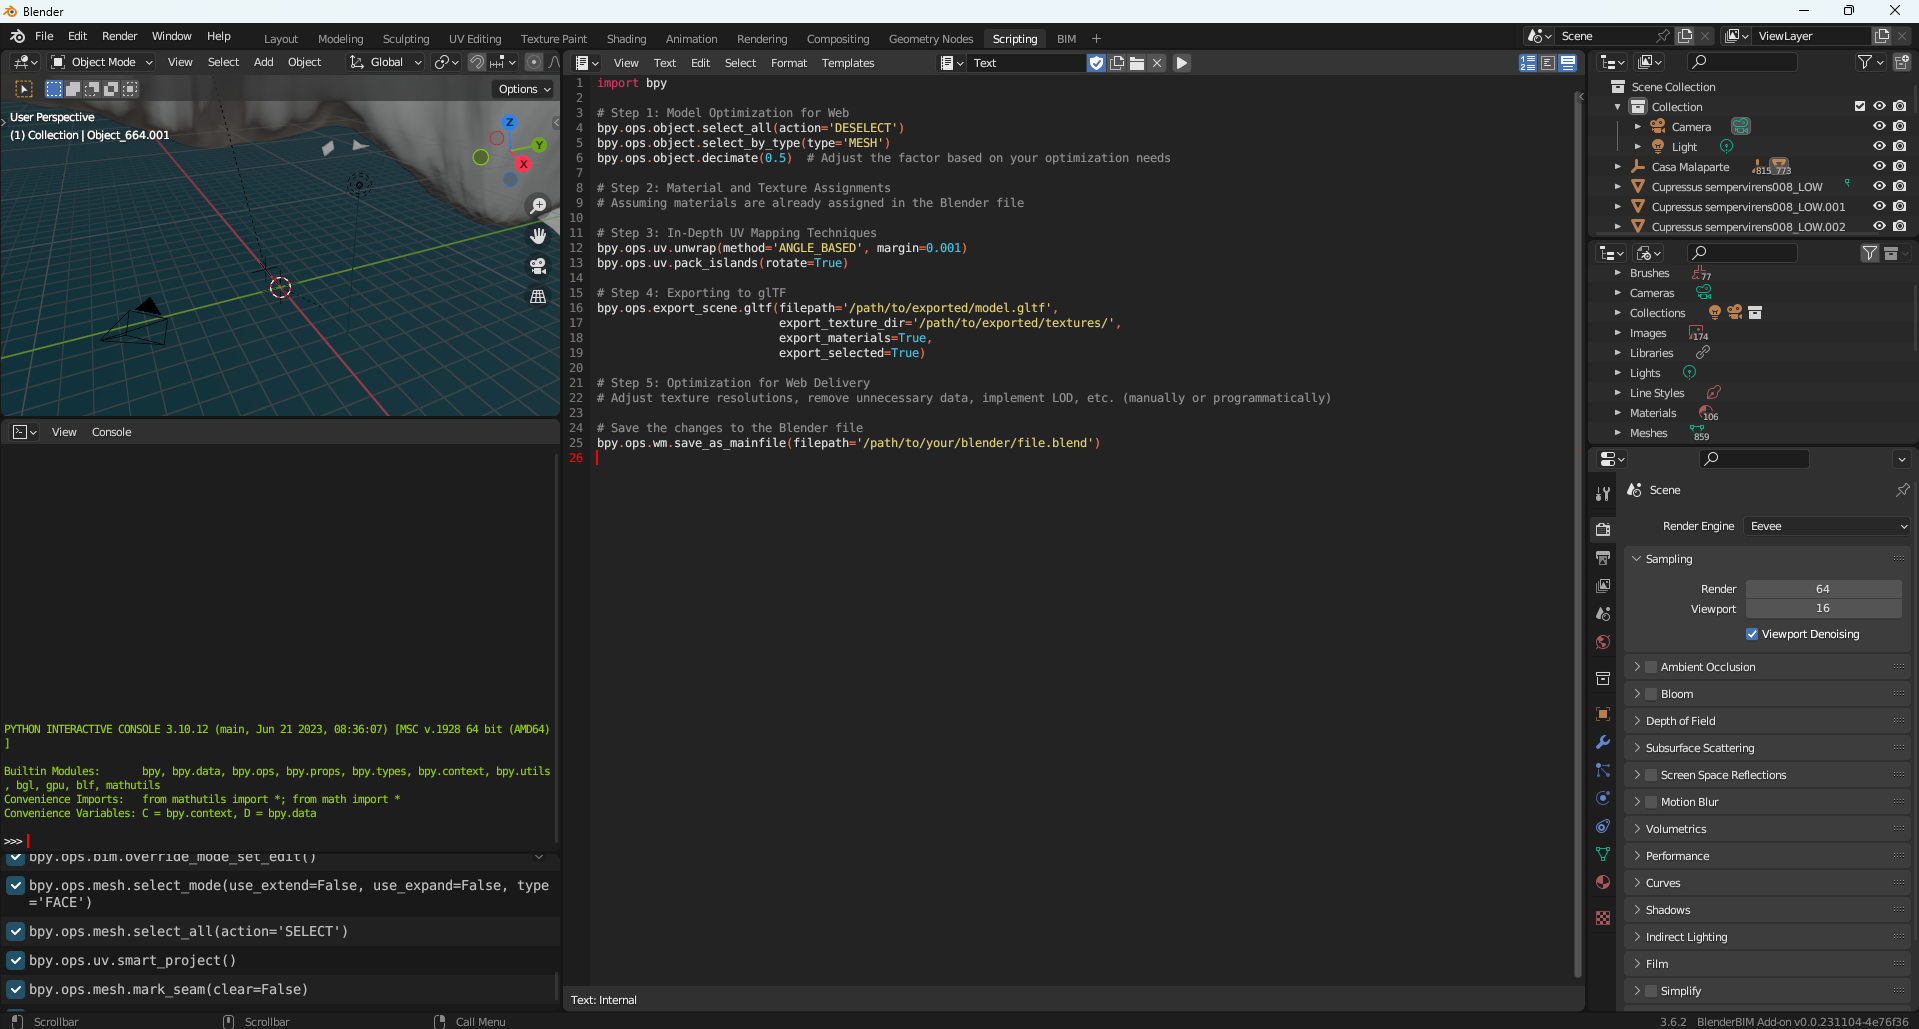
Creating a comprehensive script for Blender that automates the entire process described would be quite intricate, given the diverse steps and user-specific considerations involved. However, I can provide a basic outline that you can use as a starting point for creating your script. Note that writing a complete, robust script might require additional customisation based on your specific needs and model characteristics.
import bpy
# Step 1: Model Optimisation for Web
bpy.ops.object.select_all(action='DESELECT') bpy.ops.object.select_by_type(type='MESH') bpy.ops.object.decimate(0.5)
# Adjust the factor based on your optimisation needs # Step 2: Material and Texture Assignments # Assuming materials are already assigned in the Blender file # Step 3: In-Depth UV Mapping Techniques
bpy.ops.uv.unwrap(method='ANGLE_BASED', margin=0.001) bpy.ops.uv.pack_islands(rotate=True)
# Step 4: Exporting to glTF
bpy.ops.export_scene.gltf(filepath='/path/to/exported/model.gltf', export_texture_dir='/path/to/exported/textures/', export_materials=True, export_selected=True)
# Step 5: Optimisation for Web Delivery # Adjust texture resolutions, remove unnecessary data, implement LOD, etc. (manually or programmatically) # Save the changes to the Blender file
bpy.ops.wm.save_as_mainfile(filepath='/path/to/your/blender/file.blend')
Please note that this is a simplified script, and depending on your specific needs, you might need to extend it. For instance, optimizing LOD, compressing textures, and handling specific details of your model could require more advanced scripting.
Additionally, always be cautious with automation scripts, especially when they modify your Blender files. Always make backups and test the script on a copy of your project to avoid unintended consequences.